

Shared knowledge leads to accumulated knowledge |
| |||||||||||
cDbForm_DSFlistby David Martinko
CompatibilityVDF7 or higher required DefinitionThe cdbForm_dsflist class which is short for "databound form with a dynamic sizing floating list", can be regarded as an IDE-compatible AUTOCOMPLETE solution. This class is used to help aide in data entry. As you type, a list is shown with possible matches to what you are typing. If you see what you want in the list, you press ENTER to select the text to complete what you started typing 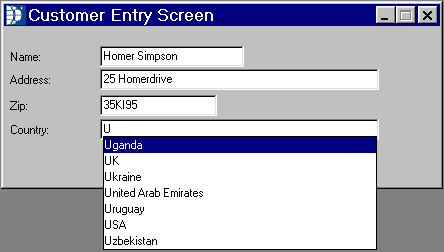
UsageAfter placing the object on your view, select the file.field you wish to data to be connected to. You may choose a separate file.field for data to be displayed from by setting the Alt_Data_File and Alt_Data_Field. You must set the Float_Index to the index you wish the searching to be performed on. This index needs to be a unique index for the data being displayed otherwise you will have the data repeated many times. I don't recommend you use this on a field for a last name because you when the user types "SMITH", all they will see is a list containing only "SMITH" and will never see "SMITHERS" until they type the "E". If the data is coming from the same file (i.e. you didn't set the Alt_Data_File) then you can set the Float_Find to TRUE. This option will allow the record you just selected to become the current record. This action is simular to that of the selectionlist class, just a bit faster for data entry. Let's say you want to use the Float_Find in an Invoice# field. You want to help the user by showing all possible invoices matching what they entered. In this case, it would help to show the find results in descending order. This can be done by setting the Find_Dir to DF_DESCENDING. You can control the number of finds done by setting the Max_Finds. This is beneficial when working with large files where a single key press could slow down the system if you find every record starting with the entered character. I recommend you set the limit to 10. After the first 10 matching records have been found, it jumps out of the find loop, even in descending order.Below is the example code that created the image above:
    Object oDbform_DSFList1 is a cDbform_DSFList

        //AB-StoreTopStart
        Set Alt_Data_File  To Country.File_Number
        Set Alt_Data_Field To 1 // Country.Name

        //AB-StoreTopEnd

        Set Float_Index to 1
        Set Max_Finds to 15
        Set Enter_Find to TRUE
        Set Label to "Country:"
        Set Size to 13 186
        Set Location to 57 64

        //AB-StoreStart

        //AB-StoreEnd

    End_Object    // oDbform_DSFList1
InstallationWe will describe here how-to install this package into the orderentry workspace
SuggestionsHave a datafile for Cities. As the user types, they can select a City from the list. Modify your save routine to check if the city exists and add it if not. Then a simple entry screen for the users to edit any cities that maybe in the list to remove misspellings or duplicates (i.e. Clinton Township, Clinton Twp). |
||||||||||||
|
||||||||||||
Copyright © 1999 - 2024 VDF-GUIdance on all material published, for details see our Disclaimer. |
||||||||||||
